Sunday, May 31, 2015

Let There be Light

If you were wiser you would get out
And the light that shines through the shining night
Is a lamp that I carried from my mother's home
And the light that burns through the window pane and the love remain


-Stevie Nicks - Blue Lamp


After a long time of not much happening, suddenly, A Great Deal Has Happened.

Episode 1: We go to an Event in Clinton, Break Camp Early, Load, Drive Home, Unload, Load Again, and Drive to Tuxedo

So it turned out that the best plan was to drop the vardo off with Mr. Lars at his Boothe at Sterling Forest Renaissance Festival in Tuxedo and leave it with him a while so he could work at it on his home turf, as it were. Moreover, it worked out in Just Such a Way that the best time to do it was on the Monday of Memorial Day Weekend.

The plan was to attend Settmour Swamp's Quest for Wit and Wisdom event, which we go to every year. (This year's theme was the Quest for the Treasures of Timbuktu.) We would arrive onsite Friday night, and enjoy the event on Saturday and Sunday. Monday morning, we'd break camp, pack up ourselves and Ian's stuff, go home from the site in Clinton, unload EVERYTHING, and strip the vardo down bare, load up ALL THE BUILDING materials and then journey to Tuxedo.

Which is what we did.

Here's some pics of the event:

Here's the vardo parked, along with Ian's Viking A-frame. Later in the event I set up the awning, but I didn't take a picture of it.
Jazz Paws!
Much fun was had by all. But on Monday morning, we duly packed up, drove home an hour from Clinton, unloaded the camping gear, stripped down the vardo, paused for a sammitch, re-loaded all the lumber and materials, and then drove an hour and a half to Tuxedo.
Here's an interesting aside: When we got home, we found all our lawn-gargoyles having a kaffeeklatsch on our doorstep. (We do not know how they got this way. Apparently they can only move when you're not looking.)

One lump or two, Gertrude?

After pondering the gargoyle mystery a moment or two, we hopped back in the truck and dropped Brigitte off at Daddy Lars' Armoury Shoppe. Here she is parked with one of her four sisters, ready for action:

I must say, I rather prefer the Ren Faire when it's all empty and peaceful. It was quite lovely. 

During the week, Lars sent me a bunch of pictures of his progress with Brigitte. Here's a sampling:

The bed deck area. He's put up insulation and wainscot paneling, and created shelves at the head and foot. 

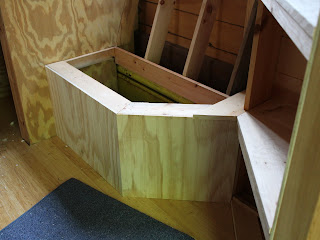
A bench. Wainscoting applied, but the lid and bench back still need to be put on. 

Corner shelving and closet area. The closet will have a curtain for the door. 
 
The insulation is a whole bunch of cooler boxes that we got in the mail from various frozen-food shipments. Norm cut them up on the table saw to recycle them for the vardo's insulation. This is looking up at the ceiling.
Episode 2: Meanwhile, Back at the Ranch...
(Or, Jenny learns to solder.)

While the vardo's gone, we decided to do some of the projects that don't require the vardo being present to accomplish. Firstly, the lighting.

Last year, I ordered several star-shaped lanterns from various places online. We got two rose-colored seven-pointed lanterns and four white five-pointed lanterns. The rose-colored ones are destined to be 'porch lights', and the whites are for the interior.

We're planning on installing a 12v electrical system powered by a battery located in one of the bench seats. I got a whole bunch of 12v marine grade outlets and plugs. Lars will be wiring the vardo. Meantime, Norm and I wired the lanterns to use 12v LED lights. The plan is to have an outlet near the ceiling with a switch for each, so the lanterns can be unplugged and stowed for travel.

Step 1: Wire the Plugs:

I used a lamp cord replacement and cut the 8' length into four 2' lengths. Then I simply followed the directions that were provided by the plug manufacturer. The hardest part was getting all those hair-thin wires twisted together tightly enough so that they'd go into the terminal holes.

Step 2: Drill a Hole
The two 7-pointed lamps had a shallow brass dish which was designed to hold a votive candle. I had Norm drill a small hole for the wire here. (Norm did this part because I didn't want to risk breaking the fragile glass with my half-assed inexperienced attempt.)

Step 3: Thread the Wire Through and Solder it to the Socket Tails

I threaded the wire through the hole and then soldered it to the LED light socket. Here is my very first attempt at soldering; how did I do? (Norm said they were 'tits-and-beer' so I guess that means a good first effort!)

We used 'liquid tape' to seal the wires back up:

Step 4: Cable Ties

Next I used cable ties to secure the wires to the frame of the lantern. Since they're going to hang up, I exited the plug end through the top. All the ties were clipped off short.

Step 5: Light 'er Up!

We plugged each light into the 12v outlet in my car to test. Ta-DA! Pretty, Yes?

Each LED bulb gives the equivalent of a 30-watt incandescent. Here's a link to the place I got them: LED Light Bulb

They're only about $4 each. This is a really great website, too - lots of different LED types for different purposes. We chose these because they got lots of good reviews for different applications, and they were (hopefully) bright enough without being so bright they blind our campmates. (That would be bad.) 

Next: Brigitte is Back Home and ERMAGHERD THERE ARE SO MANY PROJECTS TO DO I'LL NEVER HAVE ENOUGH TIME FOR THEM ALLLLLLLLLLLLLLLL!!!!!!!

Monday, May 18, 2015

Heart of Glass

Once I had a love and it was a gas
Soon turned out had a heart of glass
Seemed like the real thing, only to find
Mucho mistrust, love's gone behind


Much to my dismay, it had become apparent in the last couple of years that the windows were simply not up to the rigors of the road. They're old, after all. One of the windows in particular was about ready to fall apart - the leading had broken and a pane was loose. Norm taped it up with cardboard, which, as I'm sure you can imagine, looked like arse.

On the advice of our builder, we decided to try something in a last ditch effort to make the windows useable. He suggested we pour acrylic resin over the windows, to fill up one side and encase the glass, embedding the whole kit and caboodle in plastic.

I realize that there are those out there who might object to doing this, in the name of preserving antiques, but really, we had no choice. They were literally falling to pieces. This was the only way we could save them without paying a LOT of money to a glass worker to remove them from the frames and completely re-lead them. (I did look into this; it would have cost me FOUR TIMES what I originally spent on the windows.
This was really the only way.

I figured, if I totally screwed them up, we could punt by replacing the windows with shutters.


Step 1: Cleaning

This step was about as much fun as you might think. I used denatured alcohol to thoroughly clean both sides of the glass. painstakingly removing every bit of tape goo, grease, and smutch. I wasn't keen on permanently embedding dirt in the plastic, nor did I want the stuff to not stick because of oil or grease on the glass.

Step 2: Sealing

I wanted to make sure that when I poured the acrylic into the back side of the frame, it didn't seep totally through the glass and make weird drips that would harden into plastic spikes. Nor did I want to epoxy the window TO the worktable. So I took cardboard covered with saran wrap and taped it to the back of each window, to support the glass and contain the resin. I used a SHITLOAD OF TAPE.

Whether this technique worked as I envisioned we'll discover shortly.
Saran wrap doesn't stick to the resin. Cardboard to support the damaged panes. 

All four windows prepped with saran wrap, cardboard and LOTS OF TAPE.

Step 3: Pour
This is the step that kept me awake the night before, because the ratio of hardener to resin is really, really exact. How much you need depends on a lot of factors:

1) Air temp and humidity
2) Thickness of the layer being poured
3) How many layers are being poured

If you're doing more than one layer, you have to decrease the amount of hardener for each successive layer, because the heat will build up from previous layers and accelerate the process. Plus, trying to figure out how deep a layer I could pour for each window with the gallon of resin I'd purchased strained my very non-mathematically inclined brainmeats.

Chemistry Class. Note my notes under the two tiny bottles of hardener. 
Now, hardener is measured in DROPS per ounce of resin. I was working with 32 ounces per window, which came out to 256 drops per batch. If you've ever had to measure out 256 drops of anything, you will understand how it is an activity that WILL drive you INSANE.

Having no other choice than hold my breath and proceed, I counted my drops, mixed my resin, and POURED.

How did it turn out?

Reasonably well, actually. The resin did indeed leak all over the place - my tape job did not stick well enough. It got EVERYWHERE. This wasn't as big a disaster as it could have been, though - I'd put down a LOT of newspaper. The most damaged window leaked like a sieve - resin got on both sides equally. The other windows also leaked, but to a lesser extent.
As the resin entered the semi-hardened 'gel' stage, Norm and I, realizing that every window had resin leaking, tore off the cardboard and tape. Working quickly, we were able to peel off the jelly-like half-hardened resin with a chisel and razor blade, and clean up the spillage before it got all the way hard. It's a damn good thing we did, too- that stuff got hard as a rock by the next day.

As you can see here, it's a bit oddly textured. That's because I covered the wet side with saran wrap to prevent bugs from landing in it. Originally I'd taped it over but not touching the wet resin, but somehow (maybe the warmth of the resin, it got pretty hot) the saran wrap collapsed into the resin. By the time I saw the problem, the resin was gel-hard and the wrinkles were permanent.


On the plus side, the glass is now just about bulletproof. I do believe that these windows would survive a nuclear blast. Mission accomplished. 

Step 4: Finishing

I had stripped about 25 layers of paint off these windows last year, and stained them when we originally thought we were going to keep the vardo natural stained wood colors. That didn't work out, so now the windows needed to be painted to match the new color scheme.

There were also some divots of wood missing from a few of the windows - the one with the most damaged glass also had a big chunk out of the frame, so I patched up all the frames with Minwax High-Performance 2 part wood filler. This stuff is really good - hardens in a few minutes, is layerable, sandable, stainable and paintable. 
All of that white stuff is where I had to re-construct where the hinge had broken off a chunk of wood. 

I took a sander to each window and smoothed out the putty and roughed out the surface. Norm used the belt sander in places where we needed to take off a lot of surface. 

Next, I applied two coats of the indigo exterior paint to each window. Et voila!


You can't even see where I did the filling, it's totally invisible. Norm painted the window-openings and sills the same blue. Here they are back in the vardo:


So, In general, the Great Resin Experiment was a success. In hindsight, I can think of a few things I'd've done differently. Like I would have put a layer of duct tape directly on the glass to prevent leaks. I also would not have used saran wrap on the surfaces, which would have come out smoother. 

But I had fun working with it, and I can think of a bunch of projects one could do. One that I saw online is for a table filled with resin that was mixed with glow in the dark powder: 

Except I think I'll use a router to make a design (Like the door to the Mines of Moria) and fill the design with the glow resin. THAT would be cool!

Next: The Return of The Lunde?